Tuesday, February 26, 2013

Playing Around


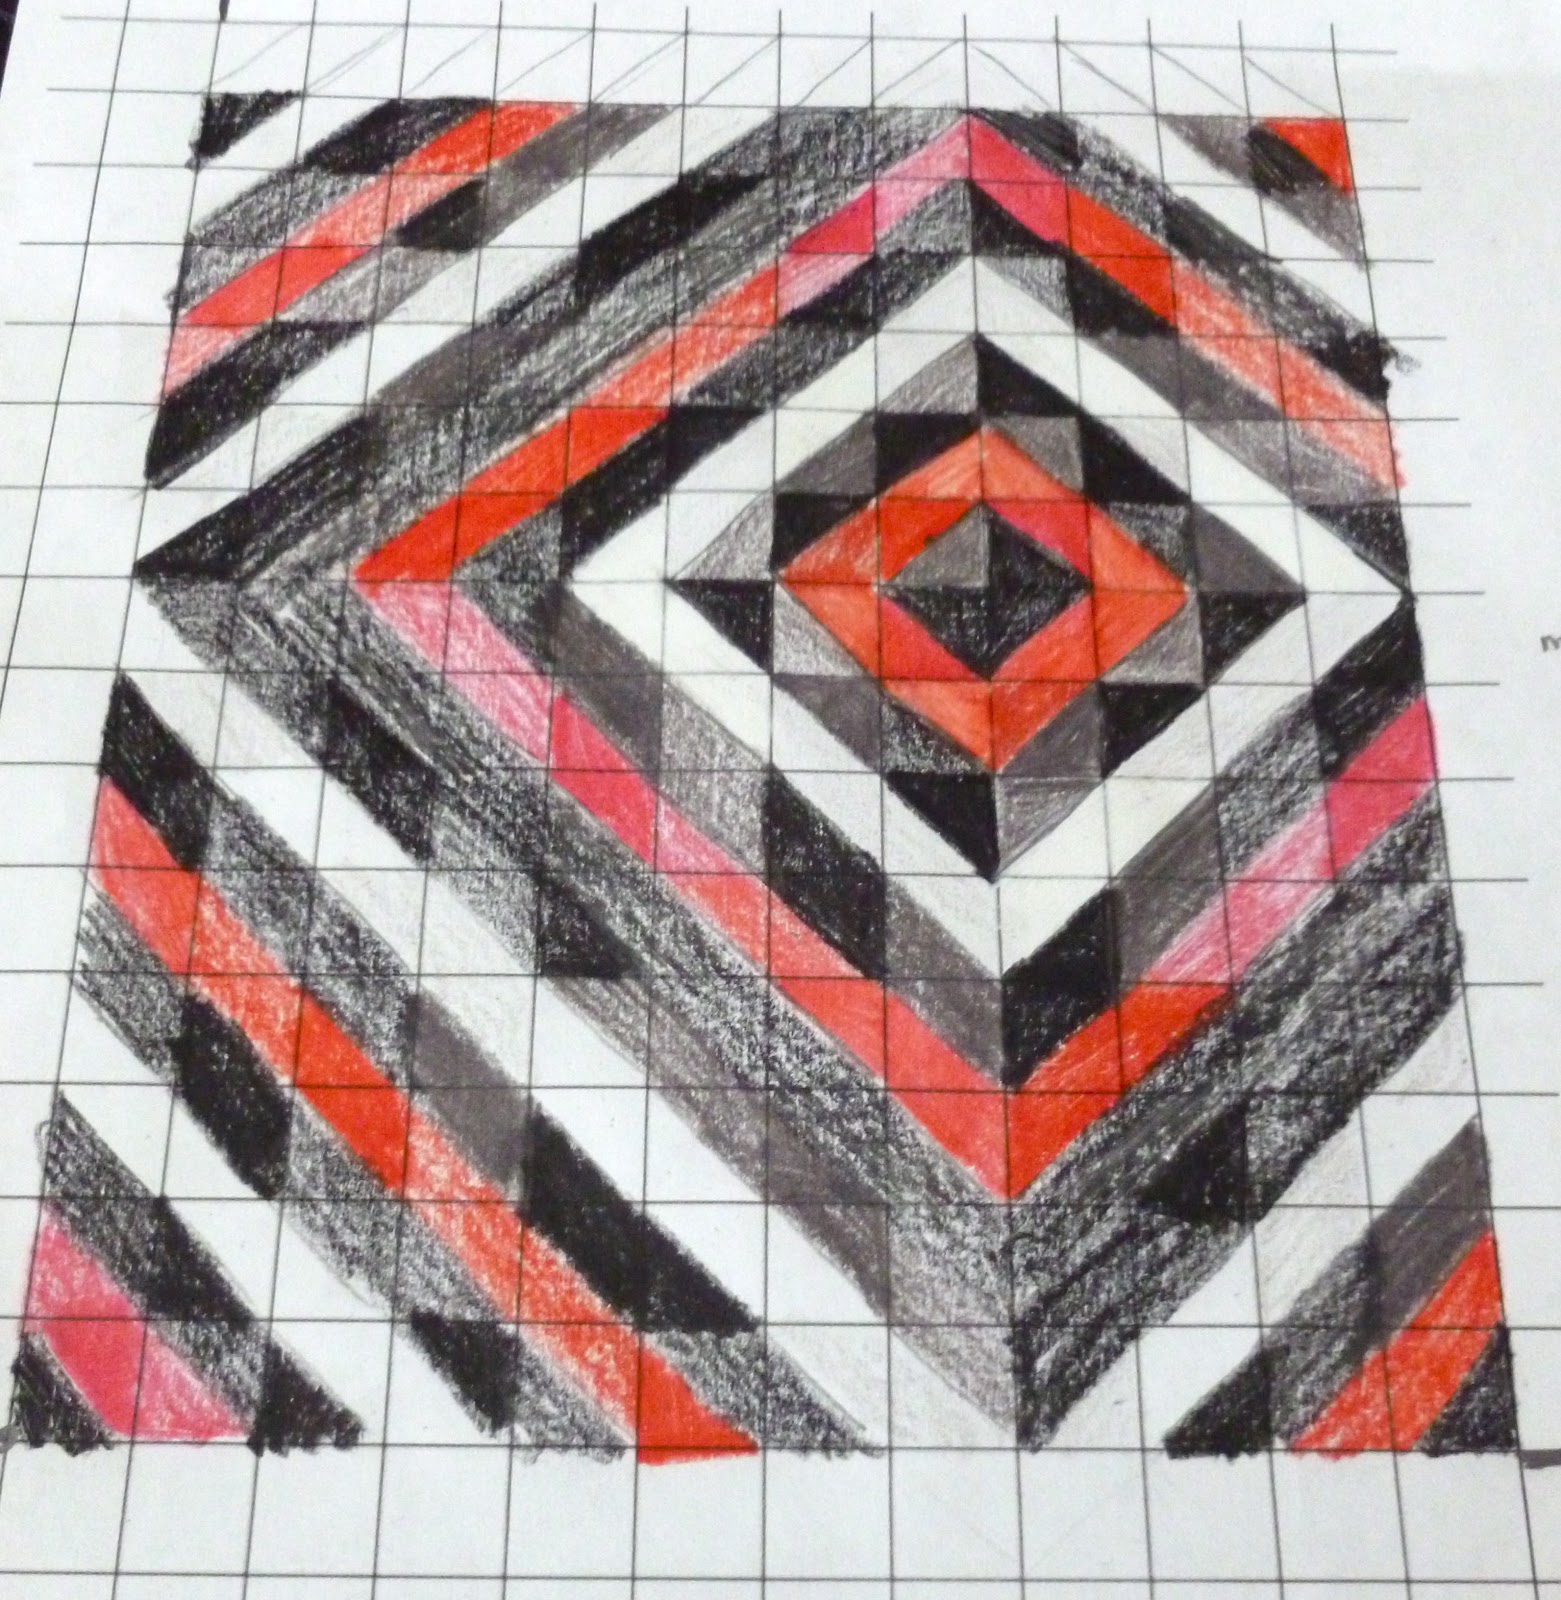
I wanted to make a red, white, grey and black quilt for someone who loves red. This quilt included many many many HST's. I had an idea and I drew it out...


Then I made HST's and HST's and more HST's. I don't mind the repetitiveness of this activity as it is systematic and organized and produces a lovely pile of pretty little squares when complete. As I may have mentioned before, this type of activity fits well with my personality!


I used many different gorgeous print fabrics and did not plan for which went together. I was really trying to let myself go for the scrappiness of it all (Ha ha, I say now in retrospect).


I was super duper excited to begin playing with my squares. I popped them up onto my design wall into the pattern from my sketch and went 'ohhhhhh'. I went 'ohhhhhh', not in a good way. Boring. Messy - definitely not organized. I felt like my eyes had no where to rest. Man o man - I really have a hard time with scrappy. Why is it that I LOVE and ADORE so many scrappy quilts out there - yet I cannot feel it when it's mine??!!! I took it down so fast I actually did not even think to take a picture to share!


I did enjoy the play the ensued though. It's amazing how many designs these HST's can be rearranged into. I had no idea! I played and I played...


And I played...


I liked this diamond one, but felt it still did not offer enough rest for my eyes. I realized here, during this stage, that I liked the diamonds - especially with the backgrounds of each diamond using the same fabrics. I was getting somewhere.


Go bigger. I decided that bigger might help with the busyness of all the different patterns in the fabrics. I liked these new, bigger diamonds a lot.


Then I put my 2 ideas together, bigger diamonds - with fabrics in the center and backgrounds that match and YES! This makes my eyes and heart happy. This is the design I am going with. It has meant there has been some (MUCH!) stitch ripping and re-sewing to make enough HST's with the same fabrics for each block, but it is by far worth it as I see the design grow and I know it is the 'right' one.


I love how the design process is dynamic and flowing. It is interesting to me to see what I start with and what I end up with. I love that I can keep going when something doesn't please my eye - until I find just the design that does. These steps in the design of this quilt have been a great learning process for me. Now that I am settled on the design, I have begun to think about the quilting - always my fave part!


Hope you are all having a fabulous week in sewing and such! Linking up with Work in Progress Wednesday at Freshly Pieced.

~Lisa


Sunday, February 17, 2013

Duplicity

I really HAD to make another mini heart quilt. I enjoyed the process immensely. I pretty much stitched the last stitch on this binding and then picked up my rotary cutter and dug in my scrap bin - more 1.5 inch squares were on my agenda. Some of these wee squares were turned into teeny tiny HST's...


Some miniature HST's...so freakin' cute.


 For me, the layout stage is always a party...


As in my last mini heart, I found the task of transfering the squares to the grid quite satisfying - very neat and tidy - every little square in its own little home. For both my mini heart quilts I have used this fabulous tutorial to make the block.


And finishing up at a whopping 12 inch square...I have added this little one to the growing collection on my sewing room wall.


Have a wonderful week all! What sewing fun have you been up to? Linking up with 'Let's get Acquainted' Monday link up being hosted by Martha at Weekend Doings.


~Lisa

Monday, February 11, 2013

And She's Done!

I finished up this wee little heart last week. It sewed up as a 12 inch square mini quilt - complete with a toile (my fave!) binding. 

I mentioned in my previous post that I was going to use this tutorial to sew it together. Well, let me tell you....what fun I had! I loved this technique and it sewed up very easily. The funniest part was when my family saw it go from being laid out on my cutting table as 1.5 inch squares (18 inches across in total) to being sewed up as 1 inch squares (12 inches across) - they could not believe how much it SHRUNK.


I decided to quilt it with a free hand 'sketchy' type stitch, a heavy thread and my triple stitch function on my machine. I even 'coloured in' the corners, allowing myself to sketch with my needle and thread. Choosing to quilt in this free form way was VERY hard for me, as I am a 'a place for everything, and everything in it's place' kind of gal and letting myself 'freely' stitch feels foreign and disorganized to me. I far prefer the stream lined feeling of stitching from side to side in STRAIGHT lines. Even though I like the way it turned out, I still have the urge to rip it all out and do straight lines! HAHA!


Ooooh love the look of all these 'organized' and tidy seams. So pretty!

When making small quilts, I really enjoy the opportunity to practice my binding. For some time now, I have been narrowing down the binding steps/techniques that work/don't work for me, in an effort to come up with my 'works every time' binding that makes me feel happy with it EVERY time. So far, my bindings have been a little haphazard for my liking. For this reason, the last time I bound a quilt, I wrote a list of what worked and what to try for future. This is the list I used this time...I am definitely getting closer to my happy place!


When I pinned this little quilt up on the wall in my sewing room, the first thought I had was 'it needs a buddy'! I may or may not have already started cutting out more little squares...here's to a wonderful week of sewing! Have a great week all.


~Lisa


Saturday, February 2, 2013

On my Mind

Ever since I saw this fantastically fabulous quilt by Jolene from Blue Elephant Stitches -it has been on my mind - such inspiration in a photo! I needed a pick me up this weekend -something fun and new and colourful- so I decided to follow my hearts inspiration and make a heart quilt of my own.

I began cutting wee little squares (1.5 inches each) late last night...and laid out my plans.


I was pondering how I was going to sew all these mini squares up into a block and then I remembered that I had bookmarked a tutorial - a mad dash through my bookmarks and I came up with...this tutorial. Genius! 

So, following the tutorial, I drew myself a grid. I drew mine on the back of some lightweight fusible interfacing.  To help guide and keep my lines straight, I used my cutting mat, lining up my ruler on the same line on each side.  The tutorial suggests drawing the grid on some muslin, which I may do next time, as it means you can use it over and over by simply laying your interfacing over top of it to see the squares. 


I flipped the interfacing over and began to lay my squares on top of the fusible side, using the grid to give each of my tiny squares their own little spot. I loved this part - it really spoke to my affinity for organization and orderliness. The interfacing's gluey side has a slight rough surface, which holds the little squares from shifting too much before you iron them.


And the VOILA! I ironed it and so far it looks like this....


Now, to follow the next step in the tutorial, I need to fold along each line (one at a time) and iron it into an accordion of sorts to prepare the sections for sewing.

Not sure what this guy will be made into - likely a mini quilt. I like the opportunity to practice my binding and quilting that a mini quilts offers and also because I think he will look so cute hanging on my sewing room wall.


Happy sewing all!

~Lisa